
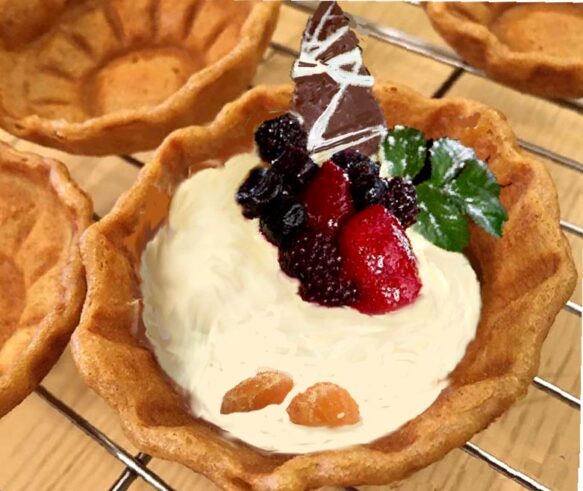
Gluten-Free Vegan Waffle Bowl Tart Recipe
HOW TO MAKE PERSONAL SIZED TART SHELLS,
WAFFLE BOWLS, or MINI-PIES FROM A SIMPLE
BATTER RECIPE. NO DOUGH, NO ROLLING!
Make Gluten-Free Dairy-Free Mini-Pies using
any classic pie filling. They make great food gifts!
Standard tarts of the past required dough and
rolling. Those are difficult to create in gluten free or
dairy free.
Now it’s so easy to make delicious exciting desserts,
appetizers, even side dishes, gluten-free and dairy-free.
the filling ideas are as endless as your imagination.

They can be used (un-sweetened) as main meal side-
dishes, or with sugar as exciting desserts.
fill them with fruits or chopped fresh salad veggies,
or mixed cooked veggies in thick sauce.these pretty
tarts are flaky and crisp.
(For some easy dessert-filling see recipes below).
I do not get any compensation for recommending
this appliance.
Here’s why I’m recommending a waffle bowl maker.
I had set out to make gluten free Ice cream cones.
When I read how to make them, it didn’t look like fun
to roll hot waffles into cone shapes before they cool
and hope they don’t break or leak.
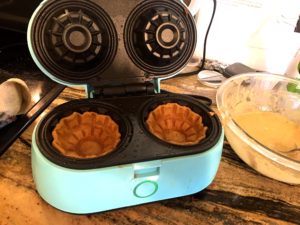
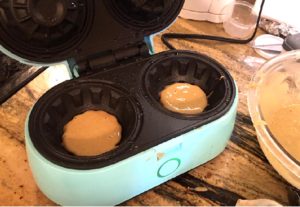
When I saw this handy-dandy waffle bowl maker, I
immediately thought of instant tart shells!
I always wanted to make tarts, but gluten-free dough-
making can be tricky and time-consuming. Now tarts
are easy and fun to make! Waffle bowl makers are
sold on Amazon. (I paid a bit less at Target).
All I needed was a gluten-free waffle bowl batter
recipe.
Would you believe…My machine didn’t come with a
recipe? It had the audacity to instruct me to use my
favorite waffle “mix”!
wanting to make mine from scratch, gluten-free,
dairy-free, I modified the ingredients to create the
recipe below.
my recipe came out perfect every time!
(even the first try!) I got 14 waffle bowls from
this recipe without skimping.
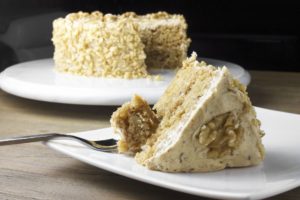
Now anyone can make all sorts of fancy gluten-free
dairy-free tarts from scratch. As a desert, Fill them with
Dairy-free cheesecake filling, fruit compotes, chocolate
cream pie, or custard.
Top with meringue. Try berries and Yogurt for a swanky
yum breakfast, or whatever you can dream up.
I’m glad I chose the double waffle bowl maker. It’s twice
as fast to make enough for a party.
They’re little bit smaller than the singular model. But this
size is perfect for most uses! (3″ diameter. x 1.5″ high).
No need to get a bigger Waffle bowl maker.
I do not get a commission on the sale of this gadget!
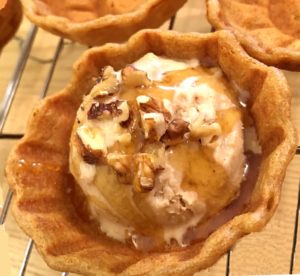
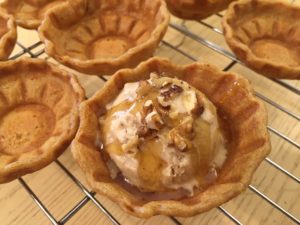
I got delicious crispy crunchy waffle cookies!! It’s the
new quick way to make gluten-free ice cream shells
and fancy desserts gluten free, from scratch. You will
love to eat the bowl!
It’s the easiest-to-make tart shells! No dough to fuss
with. This is made from this machine and the simplest
waffle batter.
VEGAN WAFFLE BOWL TART RECIPE
Ingredients
1/3 cup coconut sugar
1 egg, lightly beaten
1/2 cup dairy free milk
3 tbs. melted coconut oil
1/2 tsp. vanilla extract
1/8 tsp. salt
3/4 cup gluten-free oat flour
1/4 cup tapioca
2 tsp. baking powder
Instructions
Step 1 – Preheat waffle bowl maker
Step 2 – In a large bowl, whisk together sugar, egg, and
milk until blended. Whisk in melted oil, vanilla, and salt; then,
whisk in flour and baking powder until batter is smooth.
Step 3 – Add up to 1/4 cup of batter to the bottom of the waffle
bowl form, close and bake for 2- 2 1/2 minutes or until
steaming stops and waffle bowl is golden brown.
Using tongs, (important), carefully remove the bowls to
a cooling rack. Cool thoroughly before using. Bowls may
be stored in a tightly covered container in the fridge for up
to a week. Crisp them if desired in 5 minutes in a toaster oven.
* A tart batter recipe that forms its own self-crust.
SELF-CRUST TARTS
SUGGESTED FILLINGS
FOR WAFFLE BOWLS
For SIDES or APPETIZERS
RECIPES BELOW
BAKED APPLE
TAPIOCA CREAM FILLING
BAVARIAN CREAM
TAPIOCA PUDDING
VEGAN VANILLA PUDDING
NO-BAKE CHOCOLATE PUDDING
MARSHMALLOW FLUFF TOPPING
MERINGUE TOPPING
MINI-QUICHE
PIZZA MINI-QUICHE
***************************
Meringue is really one of the easiest, most
impressive, Healthy White Frosting Recipes.
Bake 10 minutes, just until the peaks have
turned golden brown.
3 Ingredients
4 large egg whites
1/4 teaspoon *cream of tartar or 1/2 tsp lemon juice or vinegar
1/4 cup sugar
A few tricks when preparing Meringue
1. Separate your eggs while they are cold and then allow
them to come to room temperature for the fluffiest meringue.
2. Make sure the bowl and beater blades are cold and
scrupulously clean. Wash them again.
Any oil film can prevent egg whites from fully stiffening.
3. Take care not to over whip your meringue. It will deflate.
It should have a smooth and glossy look. Stop right there.
4. Use cream of tartar or lemon juice to stabilize (to hold its form).
5. Place meringue on baked or unbaked treats about 4 inches under
the heat and bake for about 10 Minutes until edges are golden.
Instructions
Healthy topping suggestions:
Remove eggs from the refrigerator and separate, as they will
separate best cold. Allow egg whites to reach room temperature
to allow them to whip to their fullest.
Beater blades, and bowl must be cold and spotlessly-clean
Any oil film can prevent eggs from stiffening.
Preheat oven to 350 degrees.
Whip the egg whites until they are glossy and smooth, then
add the cream of tartar or lemon juice to help the egg whites
hold their form.
Slowly add the sugar to the egg whites about a tablespoon at
a time, beating after each addition until the sugar is fully
incorporated.
Continue beating until stiff peaks form. Spread meringue on top of
pre-baked cake, pie, or pudding in their last 10 minutes of baking,
or on no-bake desserts.
Place about 4 inches under the heat and bake for about 10
minutes, until golden.
*For every 1/2 teaspoon of cream of tartar in a recipe,
you can use 1 teaspoon lemon juice or white vinegar instead.
Egg whites were used for many years before the invention of
meringue powder and will most likely work well in your recipe.
When it comes to flavor, egg whites are actually a superior
option when compared to meringue powder.
While it is not as easy to whip up large amounts of meringue
from egg whites as it is from meringue powder, egg whites
can be used to make a slightly better end product.
To make meringue from egg whites, it is recommended that
you use cream of tartar or lemon juice to stabilize it (to
stop egg whites from collapsing by preventing the formation
of overly strong protein bonds that force water out). It is this
process that causes the collapse of whipped egg whites.
+++++++++++++++++++++++++++++++
*See Recipes below for this classic tapioca
cream basic tart filling, and No-Bake Chocolate
or Vegan Vanilla Pudding Filling, Marshmallow
Fluff, and Vegan Whipped Cream Toppings below.
I had set out to make gluten-free Ice cream cones
and when I read how to make them, it didn’t look
like fun to roll hot waffles into cone shapes before
they cool and hope they don’t break or leak.
When I made the first two, and they came out perfect,
I felt empowered. Now any filling recipe can be put into
a tart shell with so little effort! You can freeze and save
the shells and revive them in the toaster oven until when
you’re ready to fill. This is so easy! I got 14 waffle bowls
all perfect!
I saved them in an airtight container in the fridge.
I made the whole batch crispier in the toaster oven
toast setting for precisely five minutes.
++++++++++++++++++++++++
APPETIZER OR SIDE DISH
VEGAN MINI-QUICHE
++++++++++++++++++++++++++++++++++++++
For Oven & For Microwave
Vegan Quiche For Microwave
Ingredients:
1 egg lightly beaten (or egg substitute)
1/4 cup frozen chopped broccoli florets
1 tbs. finely chopped red pepper
1/4 cup shredded dairy-Free cheese of choice
Salt and pepper to taste
Optional:
1 Tbs. Chopped fresh or sautéed mushroom
Season to taste such as 1/4 tsp. smoked paprika
for a hint of bacon taste, or basil, dillweed, coriander,
rosemary, tarragon, etc.
Or top with tomato sauce for a pizza quiche.
Instructions:
Grease and flour a 6 oz. microwavable mug.
Place a disk of parchment in the bottom for
easy release.
In a small bowl, whisk egg about 1 minute
until light and foamy.
Stir in remaining ingredients.
Pour into microwave-safe mug.
In 1,000 watt microwave cook on
full power 1.35 min (time may
vary by power.)
Turn mug upside down on plate to
remove Quiche and let cool. Fill waffle
bowls with Quiche.
Sprinkle with cheese and microwave
or place under toaster oven.
60 seconds or until melted.
++++++++++++++++++++++++
Mini-Quiche For Oven
3 eggs
1/3 cup coconut cream
1/2 tsp salt
1 tbs. coconut butter or oil
1/2 cup each cooked veggies,
vegan meat, and cheese.
Optional 1/8 tsp.black or white pepper
Directions:
In a medium bowl, Mix eggs, cream,
salt & pepper. Add cooked diced options.
such as carrots, broccoli, and mushrooms.
Sprinkle vegan cheese on top.On a cookie sheet,
Fill 3 waffle bowls.
Bake at 350-f 10-15 minutes.
++++++++++++++++++++++++++++++++++
DESSERTS
Microwave BAKED APPLE TART
It’s like a miniature apple pie, without
spending all day in the kitchen.
1 apple
1/2 tsp. cinnamon
1 tsp coconut oil
Optional:
1 tsp.of raisins
Sweetener (maple syrup, honey, Coconut sugar)
but it’s completely optional. The apples are packed with a
natural sweetness that’s hard to beat. Plus, the cinnamon
gives it a warm, festive flavor.
Core and chop your apple into bite-size pieces.
You can use just about any variety.
Mix in some melted coconut oil, cinnamon, and
sweetener of choice. Microwave for 2 to 4 minutes
depending on how tender you want them to be. I like mine
to still have a little bit of crunch so I usually microwave them
for 2 minutes. But if you want yours a little more cooked,
3 to 4 minutes will do the trick.
Of course, the cook time will also be dependent on
the size of your apples and the wattage of your microwave.
Once they’re ready, let the apples cool for a few minutes and
then finish it off with your desired toppings. I personally love a
scoop of ice cream on top. You can also use whipped cream.
An elegant, quick and easy dessert.
Serves 4 Total time 20 minutes
Ingredients
1 egg separated
2 cups any dairy-free milk
6 tbs.Tapioca for thick cream (3 tbs.for thick sauce)
1/4 cup coconut sugar
Pinch of sea salt
1/2 tsp, vanilla or mint extract
Beat egg yolk, stir in tapioca, sugar and salt.
cook 10 to 12 minutes stirring constantly.
Remove from heat. The mixture will be thin.
Beat the egg white until stiff but not dry and
gradually stir the hot tapioca mixture into it.
Cool and add flavoring.
Chill and serve plain or garnished with whipped
cream, chocolate ganache, fruit sauce, preserves,
or mint leaves.
Or add 1 cup of crushed fresh or frozen berries,
fruit or sliced peaches to the tapioca cream.
+++++++++++++++++++++++++++
BAVARIAN CREAM
Ingredients
1 Package fruit flavored Kosher/vegan gelatin
2 Tbs. water
1/2 cup dairy-free scalded milk
1/2 cup Coconut sugar
1/8 tsp. salt
2 cups full fat coconut cream
2 tsp. vanilla
Refrigerate coconut cream, and chill bowl and beater
blades at least 1 hour.
Soak gelatin in cold water then dissolve in the warn milk.
add sugar and salt. Stir to dissolve. Allow to cool.
Whip coconut cream in chilled bowl until stff and fold into
gelatin mixture. Pour this into a mold and chill, or fill tart
shells or our gluten free waffle bowls. Garnish with whole
or crushed berries or stewed fruit.
++++++++++++++++++++++++++++++
Tapioca Pudding (See Vegan recipe next)
3 cups dairy-free full fat milk
½ cup quick-cooking tapioca
½ cup white sugar
¼ teaspoon salt
2 eggs, beaten
½ teaspoon vanilla extract
Directions
Mix milk, tapioca, sugar, and salt together in
a medium saucepan; bring to a boil over medium
heat, stirring constantly.
Reduce heat to low; cook and stir 5 minutes longer.
Whisk 1 cup of hot milk mixture into beaten eggs,
2 tablespoons at a time, until incorporated. Stir egg
mixture back into tapioca mixture until well combined.
Bring to a gentle simmer over medium-low heat; cook
and stir 2 minutes longer until pudding becomes thick
enough to evenly coat the back of a metal spoon.
Remove from heat and stir in vanilla.Serve hot or pour
into serving dishes and refrigerate for several hours
until cold.
Vegan Vanilla Pudding
Cook Time: 10 mins Yield: 4
INGREDIENTS
3/4 cup Coconut Sugar (Or Raw sugar lighter color)
3 Tbs. Tapioca
1/4 tsp Salt
2 and 1/4 cups (540ml) dairy-free full fat Milk
2 Tbsp Vegan Butter or coconut oil
1 tsp Vanilla Extract
INSTRUCTIONS
Add white granulated sugar, tapioca and salt to a
saucepan and whisk them together. Add milk slowly
and whisk it in. Heat on medium heat and whisk constantly
while it heats.Bring to the boil and let it boil for a full minute,
whisking all the time, until it thickens.
Remove from the heat and add vegan butter and vanilla
extract and whisk in.Pour into small glasses or ramekins
and smooth down.To prevent the puddings from forming
a skin on top, you can top them with plastic wrap (optional)
so that the plastic wrap is pressed directly onto the surface
of the puddings.
Place into the fridge for 2-3 hours to set.
Serve topped with vegan whipped cream and
crushed cookies (optional).
No-Bake Chocolate Pudding Filling
Prep time: Cook time 10 minutes Yield: 1 9-inch pie
For the Crust, Waffle Bowl
*(No-Bake Chocolate Pudding Tarts)
You can make this filling standalone with no crust. Or the
almond flour crust on our mini-cheesecakes or a cookie crumb
crust.
You could even make this pie without the crust, and without
any topping. A dollop of whipped cream on each slice,
and a sprinkling of cookie crumbs will still impress the pants
off your most discerning guests, and family!
You can top it with a Quick Marshmallow Fluff.
INGREDIENTS
Stove-top Chocolate Pudding Filling,
3 tbs. gluten free oat flour
1 tbs. tapioca starch/flour
1 tablespoon (7 g) powdered kosher gelatin (animal-free)
1/4 cup + 2 tablespoons (3 fluid ounces) cool water
1/2 cup (100 g) granulated sugar
4 tablespoons (20 g) unsweetened cocoa powder
1/4 teaspoon kosher salt
3 cups (24 fl. oz.) milk (any kind), at room temperature
3 egg yolks (75 g), at room temperature
1 teaspoon pure vanilla extract
5 ounces dark chocolate, chopped
Optional: whipped coconut cream topping
Make the filling. In a small, microwave-safe
bowl, place the gelatin and water, and mix well.
Allow to sit for a few moments until the gelatin swells.
It will be lumpy.
In a medium-sized bowl, place the flour blend, sugar,
cocoa powder and salt, and whisk to combine well.
Add 1/2 cup (4 fl. oz.) of the milk, and then the egg
yolks, whisking to combine after each addition.
Set the mixture aside.
In a medium-sized heavy-bottom saucepan, place the
remaining 2 1/2 cups (20 fl. oz.) milk and bring to a simmer
over medium-high heat. Once the milk reaches a simmer,
remove the saucepan from the heat and add the hot milk, in
a slow trickle, to the bowl with the egg and chocolate
mixture whisking constantly to combine.
The purpose of adding the hot milk slowly is by bringing
the egg yolks up to temperature slowly you avoid cooking
them. Once all of the hot milk has been added, pour the
whole mixture back into the saucepan and return to the
heat.
Cook, whisking constantly, (2 to 3 minutes) over medium-
high heat until thickened enough that the whisk leaves a
visible trail in the pudding as you whisk it .
Add the softened gelatin to the pan, and stir until the
gelatin is melted.
Remove the pan from the heat, and add the vanilla and
chopped chocolate, and stir until the chocolate is melted
and the pudding is smooth.
Allow the filling to cool for about 5 minutes. Cover the pie
with plastic wrap, placing the plastic directly on the surface
of the pudding to avoid its developing a pudding “skin.”
Place in the refrigerator to chill until set (at least 2 hours).
OPTIONAL:
Directly Before serving, make whipped cream:
4 fluid ounces coconut cream and 2 tablespoons
(14 g) powdered sugar. In the bowl of a stand mixer
fitted with a paddle attachment (or a large bowl with
a hand mixer),
beat the full-fat of chilled Coconut cream with powdered
sugar on medium-high speed until stiff (but not dry) peaks
form.
Beating the cream on medium-high (for a longer time,
instead of high speed) will make a more stable whipped
cream. If you go too far and the cream starts to look more
like butter than like whipped cream, drizzle in a bit more
chilled cream, and whip it again slowly. It should even
things right out.
Adapted from Nicole Hunn No Bake Chocolate Cream Pie
Remove the plastic wrap from the chilled chocolate pie,
spread the whipped cream on top, sprinkle with a few more
cookie crumbs. Slice with a wet knife and serve immediately.
++++++++++++++++++++++++++++++++++
QUICK MARSHMALLOW FLUFF TOPPING
Prep time: Cook time: 5 minutes: About 3 cups fluff
INGREDIENTS
2 (50 g) egg whites, at room temperature
1 1/4 cups (250 g) granulated sugar
1/2 cup (4 fluid ounces) water
1/8 teaspoon cream of tartar
1/8 teaspoon kosher salt
DIRECTIONS
In the bowl of a stand mixer fitted with the whisk
attachment or a large bowl with a handheld mixer,
whip the egg whites until they form soft peaks. In
a medium saucepan, place the sugar, water, cream
of tartar and salt, and whisk together.
Cook the mixture, undisturbed, over medium-high
heat until it reaches the softball stage (240°F on an
instant-read candy thermometer). Or it forms a soft
ball if dropped into cold water.
Remove the cooked sugar from the heat and allow
it cool for five minutes, pouring the cooked sugar
mixture carefully down the side of the mixer bowl,
with the mixer on low speed (making sure the sugar
mixture doesn’t hit the whisk). Increase the mixer to
high speed and beat until the mixture thickens considerably,
becomes glossy, and mostly stiff peaks begin to form
(about 5 minutes).
Place the marshmallow creme in a sealed container
and store in the refrigerator up to 3 days. After about 4
days in the fridge the sugar in the mixture will begin to
crystallize.


1 thought on “Gluten-Free Vegan Waffle Bowl Tart Recipe”
You must be logged in to post a comment.